
TypeScript SDK Implementation
Mirko Franichevic · August 27, 2026
What Are We Going to Do?
In this guide you'll connect a TypeScript project to Praxsuite and get real data moving in about twenty minutes. You'll install the SDK (Software Development Kit), point it at your workspace, sign a user in, read and write a table, and call a Gateway Endpoint.
By the end of this guide you'll know:
What Praxsuite is and which piece of it you are talking to
Which key belongs in client code and which one never does
How to create the client, sign a user in, and keep that session
How to query and modify table rows, and when the server will refuse
Required level: You should be comfortable with TypeScript and `async`/`await`. No prior experience with Praxsuite, APIs or databases is needed. Any TypeScript runtime works: a browser app, Node, Deno, Bun or React Native.
What is Praxsuite?
Praxsuite is a workspace platform. You create data tables (like spreadsheets, but far more powerful), and connect them to your own applications through an API.
Simple analogy: think of Praxsuite as a database in the cloud that your app talks to, plus a bouncer at the door who checks what each caller is allowed to see.
Your app reaches it through the Gateway, and the Gateway offers two doors. The first is direct table access: your app writes a query and the Gateway runs it. The second is an Endpoint, a URL bound to an Automation you built in the portal, where the server decides what happens instead of trusting your payload.
Both matter, and Step 4 and Step 5 cover one each.
Prerequisites
Requirement | Description |
A Praxsuite account | Register at praxsuite.com and make sure you have an active workspace |
Node.js 18 or newer | The SDK uses the built in |
A table with some data | Any table will do. This guide reads and writes one you already have |
Your workspace id | A UUID you copy from the portal. Step "How to Get Your Credentials" shows where |
A TypeScript project | Anything: a Vite app, a Node script, a Next.js route |
What is a workspace? In Praxsuite, a workspace is your working space, like a large folder holding all your tables, forms, automations and users. Everything in this guide happens inside one of them, and its id is the only value your app strictly needs.
How to Get Your Credentials
Two values matter, and only one of them is mandatory. Both live in the portal, so sign in first.
https://portal.praxsuite.com
Your Workspace ID
Open your workspace in the portal and look at the address bar. The UUID after /workspace/ is your workspace id:
https://portal.praxsuite.com/workspace/ffd80539-a1e2-4a9e-8b33-f716bf690281
                                       ^--------------------------------^
You can also find it under Settings, in the General section.
Your Key: publishable vs secret
Praxsuite issues two kinds of key, and confusing them is the most expensive mistake you can make with this SDK.
Key | Prefix | Where it belongs |
Publishable |
| Client code. It is an identifier, not a credential, and it is meant to be readable |
Secret |
| Server code only. It carries full workspace access |
To create one, go to the Gateway panel in the side menu, create a new key, and copy it. It is shown only once.
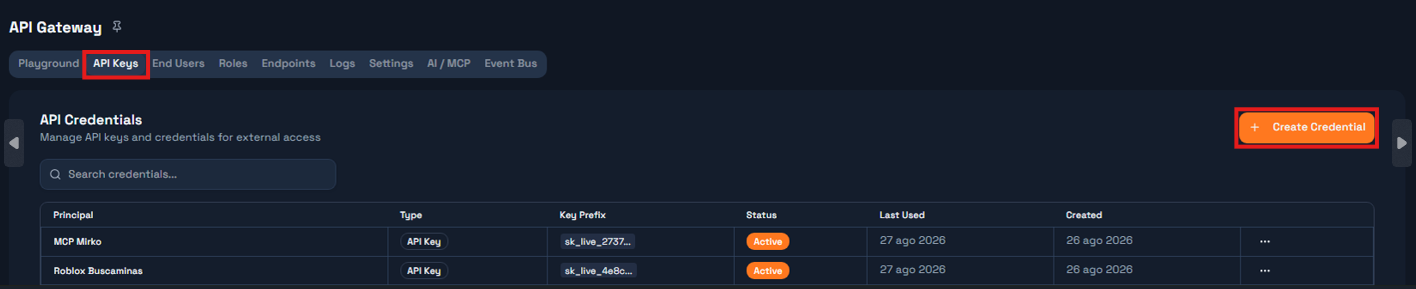
Here is the good news for a client app: you do not need to handle a key at all. The SDK fetches the publishable key from your workspace's public /auth/config route the first time it needs one. Rotating the key in the portal does not require a redeploy.
Golden rule: Never put an `sklive` key in code a user can run. Anyone who opens devtools gains that key's full access to your workspace. The SDK refuses one outright rather than letting it ship.
If you try anyway, you get a PraxSecurityError before a single request leaves:
Refusing to use a secret key (sk_live_...) from client code in PraxOptions.publishableKey.Step 1 - Install the SDK
Repository: https://github.com/TesseractSoftwares/Praxsuite-SDK-TypeScript
The package has no dependencies, so this is one command.
npm install @praxsuite/sdkThat is the whole installation. There is no configuration file and no code generation step.
Step 2 - Create the Client
Create the client once and export it. A single instance serves your whole app, because it also holds the signed-in session.
// src/praxsuite.ts
import { createClient } from '@praxsuite/sdk'

export const prax = createClient({
  workspaceId: 'ffd80539-a1e2-4a9e-8b33-f716bf690281',
})
That is the minimum: one field. The client exposes five modules, and this guide uses three of them.
Module | What it does |
| Accounts: register, sign in, sessions, password flows |
| Table reads and writes |
| Gateway endpoints, the server-authoritative path |
| Maps table names to the ids the query API needs |
| Configuration, the session, and the raw request method |
For a browser app you will usually want one more option, so a page reload does not sign your user out:
export const prax = createClient({
  workspaceId: 'ffd80539-a1e2-4a9e-8b33-f716bf690281',
  persistSession: true,
})
Important: `persistSession` stores the session in `localStorage`, which any JavaScript on your origin can read. That is a real tradeoff, and the mitigation is not to store it better: keep authority on the server, give roles read-only scopes where you can, and route anything valuable through an endpoint. Then a stolen session is worth very little.
Why the SDK 1.0.1 needs a fetch workaround
If you are on version 1.0.1, add one more option or every browser request will fail:
export const prax = createClient({
  workspaceId: 'ffd80539-a1e2-4a9e-8b33-f716bf690281',
  fetch: (...args) => globalThis.fetch(...args),
})
That version calls fetch as a method of its internal transport object, and browsers reject fetch when its receiver is not the window. Node does not check the receiver, so the bug only appears in a browser. It is fixed in 1.0.2, where you can drop the line.
Step 3 - Sign a User In
An end user is a customer of your app, not a Praxsuite teammate. Creating one and signing them in are single calls.
const r = await prax.auth.register({
  email: 'player@example.com',
  password: 'atLeast8Chars',
  username: 'mirko',
})

console.log(r.isSignedIn)          // true
console.log(r.user?.displayName)   // "mirko"
Check isSignedIn before moving the user on. If your workspace requires email confirmation, the account is created but no session is issued, and requiresEmailConfirmation tells you that is what happened.
Signing an existing user in and out is symmetrical:
await prax.auth.login('player@example.com', 'atLeast8Chars')

console.log(prax.auth.isSignedIn)      // true
console.log(prax.auth.currentUserId)   // the JWT "sub" claim

await prax.auth.logout()
logout clears local state even when the network call fails, so a user is never left looking signed in with a session the SDK has given up on.
To react to sign in and sign out anywhere in your app, subscribe. Both functions return an unsubscribe function:
const stop = prax.auth.onSignedIn((user) => console.log('hello', user.displayName))
// later
stop()
What is a JWT? A JSON Web Token (JWT) is the signed pass the Gateway issues when a user signs in. Your app never inspects it; the SDK attaches it to each request and refreshes it before it expires. What matters is that its `sub` claim identifies the user, and the server trusts that value because it signed it itself.
Step 4 - Read and Write Data
prax.data builds queries fluently. Nothing is sent until you await a terminal method, so a query object is cheap to build.
import { f } from '@praxsuite/sdk'

const filas = await prax.data
  .from('Demos Leaderboard')
  .select('Alias', 'Points', 'Motor')
  .where(f.gt('Points', 100))
  .orderByDescending('Points')
  .limit(10)
  .all()
The terminal methods are all() for the rows, page() for the rows plus metadata, first() for one row or null, any() for a boolean, and count() for the number of matches.
Writing is just as direct. Note that update and delete require filters:
await prax.data.insert('Demos Leaderboard', {
  Record: 'Buscaminas demo',
  Alias: 'mirko',
  Points: 1200,
})

await prax.data.updateById('Demos Leaderboard', rowId, { Points: 1500 })
Do not send native columns such as ID, CREATEDDATE or POSITION. The backend fills those and rejects a request that supplies them.
Golden rule: `update` and `delete` throw synchronously when you give them no filter, rather than returning a rejected promise. A caller who fires one without awaiting would otherwise get no write and no error, which for a guardrail against an accidental table-wide write is the worst possible outcome.
Why a query can stop working after you sign in
This one surprises everyone, so it is worth meeting on purpose. Run the same read twice, once anonymous and once signed in:
await prax.data.from('Demos Leaderboard').limit(2).all()   // works
await prax.auth.login(email, password)
await prax.data.from('Demos Leaderboard').limit(2).all()   // 400 No access to table 't'
Nothing is broken. The credential changed. While nobody is signed in, the SDK sends the workspace's publishable key, and the read succeeds because that key has a scope on the table. Once a user signs in, the SDK sends that user's token instead, and now the user's role decides, not the key. If the role has no scope on the table, the read is refused.
The fix is a portal setting, not a code change: grant the role a scope on that table, and set a row filter such as __SELF__ so each user only sees their own rows.
This is also why table scopes on the publishable key deserve suspicion. That key is public, so every scope you give it you give to anyone holding your workspace id.
Step 5 - Call a Gateway Endpoint
An endpoint is a URL in your workspace bound to an Automation. Your app posts a payload; the Automation decides what actually happens.
const resultado = await prax.endpoints.call<{ ok: boolean; total: number }>(
  '5e4cecb3-00c3-458c-8803-2a69742bfc8e',
  { limite: 10 },
)
call() returns whatever the Automation responded with, typed as you asked. The user's session token is attached automatically, so the Automation can identify the caller from a verified claim rather than trusting an id in the payload.
For events you do not care about, use fire() instead. It never throws and returns false when the call did not land:
await prax.endpoints.fire('<endpointId>', { evento: 'nivel_completado' })Why an endpoint and not a direct write?
Use this test: if a modified client sending an arbitrary payload could get something it should not, that operation belongs in an endpoint, and the table behind it must not be writable by the user's role.
Granting currency, submitting a score, spending a balance, touching another user's data: all endpoints. A user's own cosmetic state, like a preference or a last-viewed page, is a fine direct write.
Complete Example
Everything above, in one file you can run with node ejemplo.mjs:
import { createClient, f } from '@praxsuite/sdk'

const prax = createClient({
  workspaceId: 'ffd80539-a1e2-4a9e-8b33-f716bf690281',
  // Only needed on SDK 1.0.1. Drop it on 1.0.2 and newer.
  fetch: (...args) => globalThis.fetch(...args),
})

// 1. Read while nobody is signed in, using the workspace publishable key.
const top = await prax.data
  .from('Demos Leaderboard')
  .select('Alias', 'Points')
  .where(f.gt('Points', 0))
  .orderByDescending('Points')
  .limit(5)
  .all()

console.log('Top 5:', top)

// 2. Create an account. In a real app this is your sign up form.
const email = `demo.${Date.now()}@example.com`
const cuenta = await prax.auth.register({
  email,
  password: 'atLeast8Chars',
  username: 'demo',
})
console.log('Signed in:', cuenta.isSignedIn, 'as', prax.auth.currentUserId)

// 3. Call an endpoint. The Automation decides the result, not this code.
const marcador = await prax.endpoints.call('5e4cecb3-00c3-458c-8803-2a69742bfc8e', { limite: 3 })
console.log('Endpoint said:', marcador)

await prax.auth.logout()
Run it and you should see five rows, a user id, and the endpoint's response. If the first read fails, jump to the errors table below.
Common Errors and How to Avoid Them
Error | Cause | Solution |
| SDK 1.0.1 calls | Upgrade to 1.0.2, or pass |
| An | Use the |
| The calling credential has no scope on that table. Very often it appears right after a login, when the user's role replaced the publishable key | Grant the role a scope on the table in the portal, with a row filter |
|
| Copy the UUID from the portal address bar |
| Wrong workspace id, wrong host, or no network | A workspace lives on exactly one tier. The wrong host returns 404, not a helpful message |
|
| Check the constant actually holds a value |
Rows insert but come back empty | Column names do not match the table | Names are case and space sensitive. |
Production Tips
Give the publishable key as few table scopes as possible, ideally none. It is public, so every scope on it is granted to anyone with your workspace id. Let signed-in users get their access from a role instead.
Set the row filter and the column default together. A
__SELF__filter on the table scope covers select, update and delete, but not insert, because an insert has noWHEREclause. Set the Enduser column's default to{{claim:sub}}as well, or rows land with a null owner that the filter then hides.Pass an `AbortSignal` to calls tied to a component or a request, so cancelling actually cancels.
Prefer `insertMany` over a loop. One round trip instead of many, and one API call against your plan.
Always set a `limit`. The gateway clamps oversized requests silently, so read
page.limitrather than assuming yours was honoured.Test in a real browser, not only in Node. Node's
fetchignores its receiver, so a whole class of browser-only failure is invisible from a console script.
Next Steps
Now that data is moving, some directions to go:
Build a sign up and sign in screen with
getWorkspaceConfig(), which returns your workspace's name, logo and colours so the screen matches your branding.Move a rule that matters into an Automation and call it with
endpoints.call(), so the server decides instead of the client.Add the password reset flow:
forgotPassword,verifyResetCodeandresetPassword.Read the TypeScript SDK Use Case guide, which builds a complete game on these foundations, backend included.
You now have a TypeScript app talking to a real workspace, with a real user identity behind every request. Good luck.