Praxsuite SDK for Roblox — Beginner Implementation Guide
Vincent Depassier · June 14, 2026
What Are We Going to Do?
In this guide you'll learn how to connect your Roblox game to Praxsuite, a platform that lets you save, query, and manage data from your game in real time. Imagine having a real leaderboard, saving player progress, or logging in-game events — all of that is possible with this integration.
By the end of this guide you'll know:
What Praxsuite is and why we use it
How to install the SDK in your game
How to insert, query, update, and delete data from Roblox
Required level: No prior experience with APIs or databases needed. You just need basic knowledge of Lua and Roblox Studio installed.
What is Praxsuite?
Praxsuite is a workspace platform that lets you create data tables (like spreadsheets, but far more powerful) and connect them to external applications through an API. In our case, we'll connect Roblox to Praxsuite so your game can save and read information.
Simple analogy: Think of Praxsuite as a cloud database your game "talks to" in order to save or retrieve information. Every time a player earns points, your game notifies Praxsuite to store them.
Prerequisites
Before starting, make sure you have the following ready:
Requirement | Description |
|---|---|
Praxsuite account | You need to register on Praxsuite and have an active workspace |
A created table | Inside your workspace, you need a table with the columns you plan to use |
An API Key | The "key" that tells Praxsuite that it's you making the requests |
Roblox Studio | Roblox's development environment, downloadable from the official site |
What is a workspace? In Praxsuite, a workspace is your working space — like a large folder where all your tables, forms, and data live. When you create your account, Praxsuite guides you through creating one.
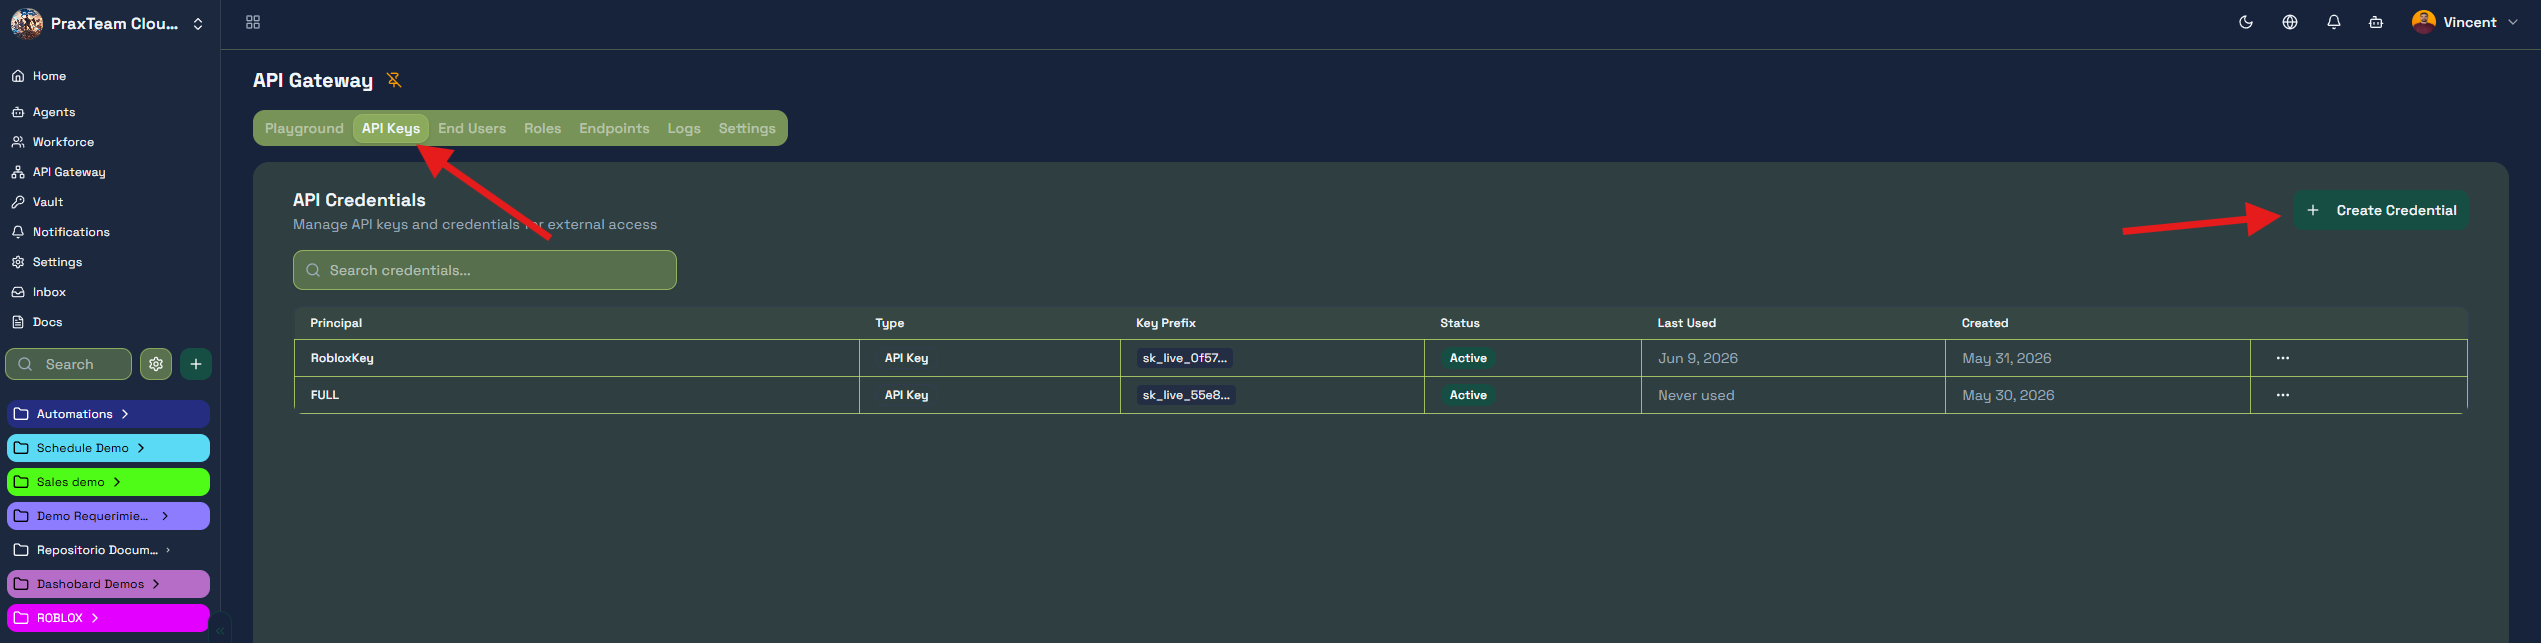
How to Get Your API Key
Your API Key is the password the SDK uses to communicate with Praxsuite on your behalf. To get it:
Log into your workspace on Praxsuite
Go to the Gateway panel in the side menu
Create a new API Key
Copy it and store it somewhere safe — it's only shown once
How to Get Your Workspace ID
The workspace ID is a unique identifier (UUID) that distinguishes your workspace from others. It looks like this: ffd80539-a1e2-4a9e-8b33-f716bf690281
To find it:
In the Praxsuite main menu, go to the workspace selector
Each workspace can be viewed as a list or grid — find yours by name
There you'll see the UUID of your workspace

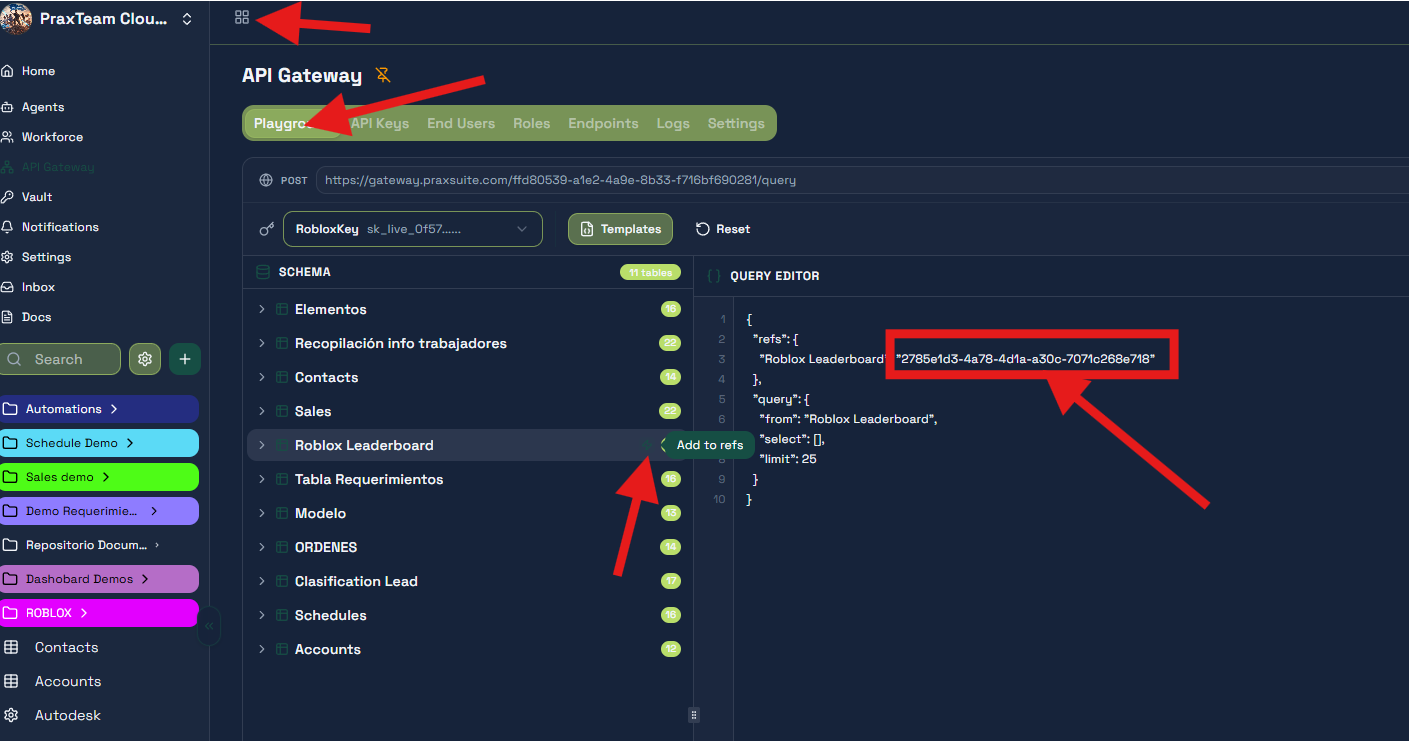
How to Get Your Table ID
Every table in Praxsuite also has its own UUID. To find it:
Open the API Gateway again from the Apps button
Go to Playground
Select the table you want to attach as a reference by clicking the indicator/rail icon on the side
Copy the UUID that appears there
Step 1 — Install the SDK in Roblox Studio
The SDK (Software Development Kit) is a set of tools someone already built so you don't have to program the Praxsuite communication layer from scratch. You just install it and call its functions.
Download the SDK
Download the PraxsuiteSDK module from the official GitHub repository: Lua SDK
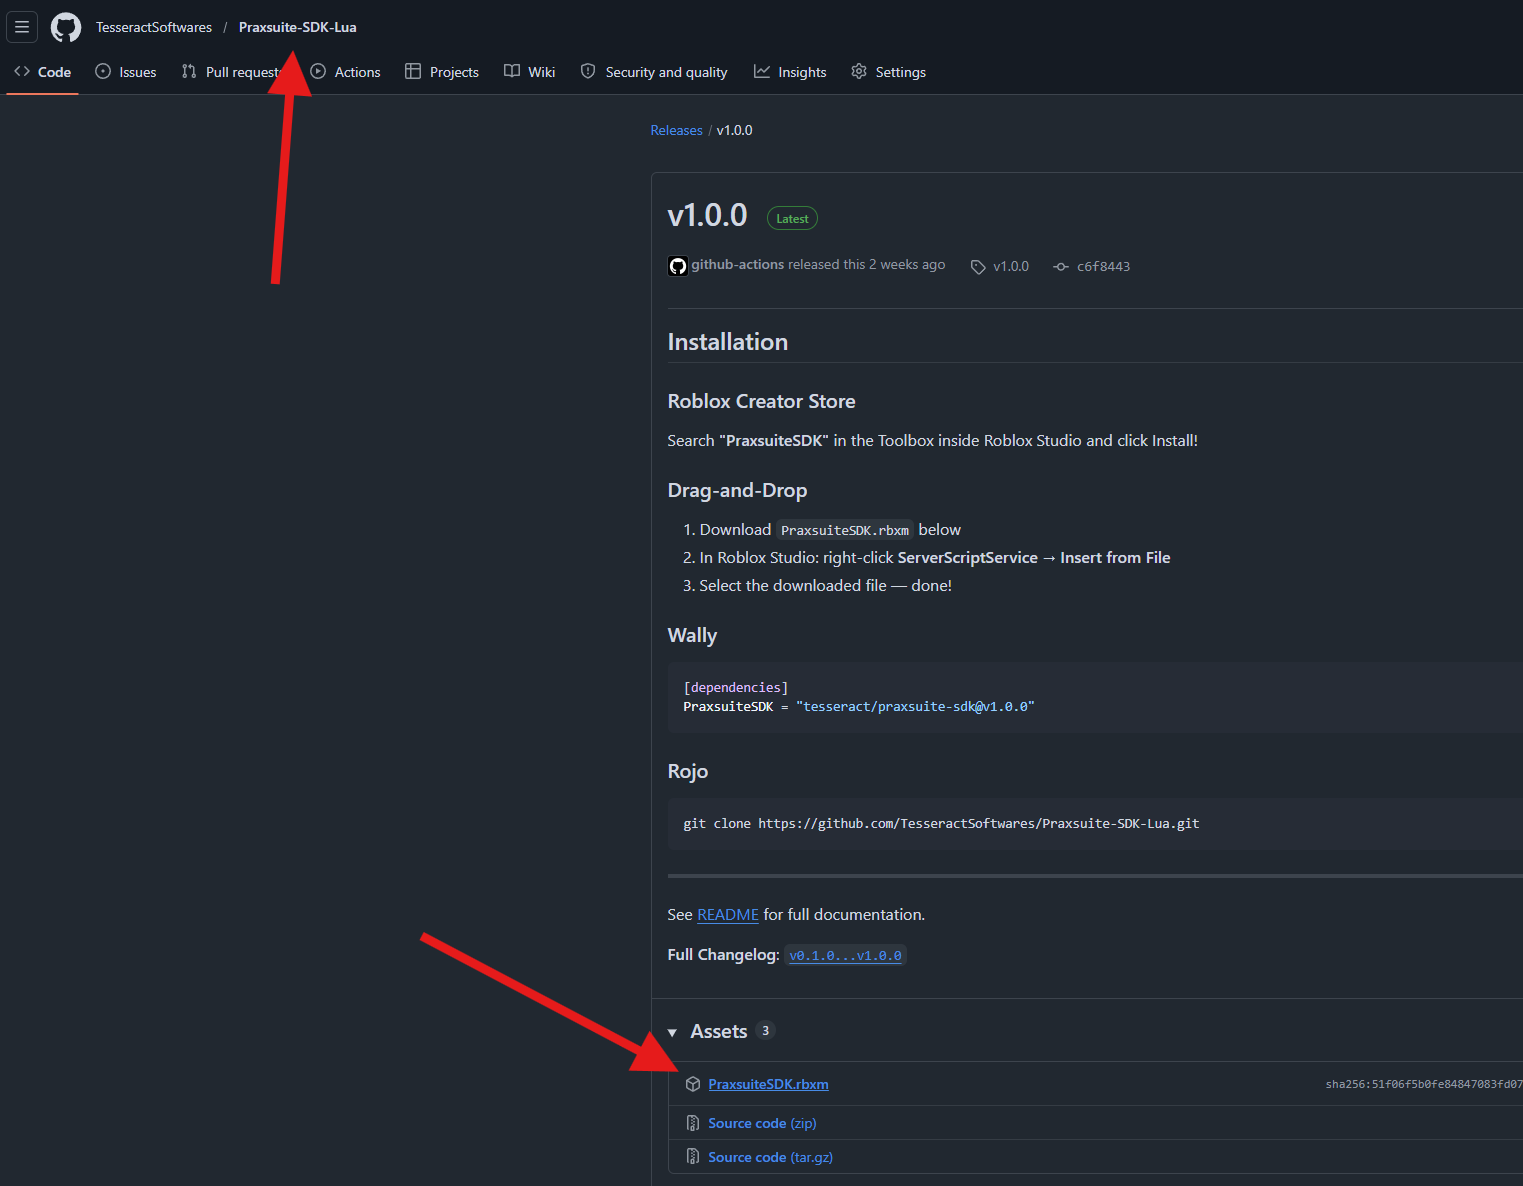
Place it in the right location
Once downloaded, place it inside ServerScriptService in your game. The structure should look like this in the Roblox Studio Explorer:
ServerScriptService/
  PraxsuiteSDK/
    PraxsuiteSDK  ← this is the ModuleScript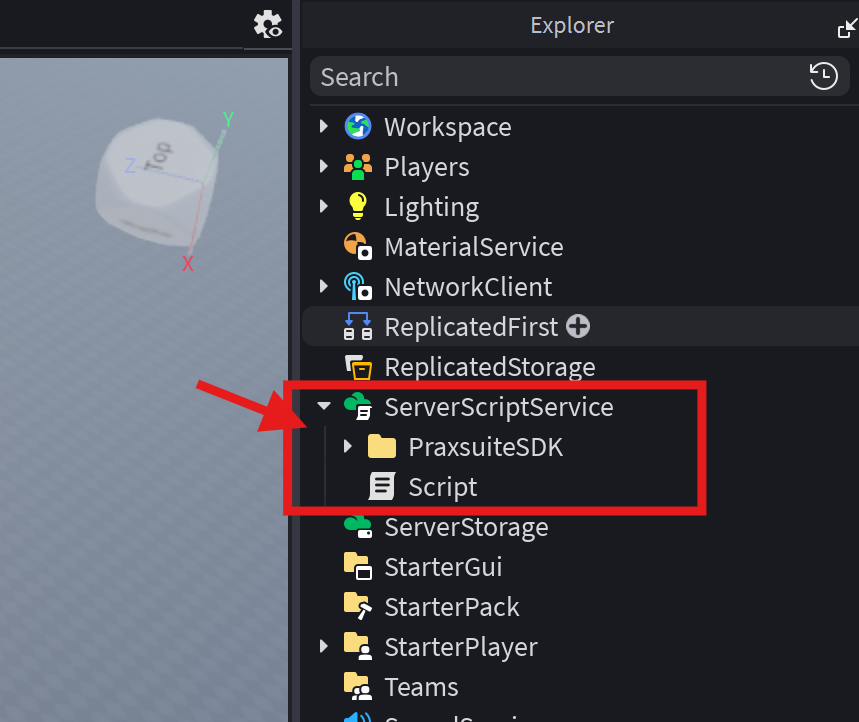
Why ServerScriptService and not somewhere else?
This is critical and one of the most common beginner mistakes:
Scripts in
ServerScriptServicerun on the server — players cannot see their contentsLocalScriptsrun on the client (the player's computer) — anyone could inspect their code
Your API Key is like a password. If you put it in a LocalScript, any player with basic tools could read it and use it to access your database. Always use the SDK from ServerScripts.
Golden rule: If a script uses the Praxsuite SDK, it must be a ServerScript — no exceptions.
Step 2 — Create Your Main Script
Inside ServerScriptService, create a new Script (not LocalScript). You can name it PraxsuiteMain or whatever you prefer. This script is where all the Praxsuite connection logic will live.
Step 3 — Import Dependencies
At the top of your script, you need to "bring in" the SDK and Roblox's Players service. In Lua this is done with require:
local Praxsuite = require(game:GetService("ServerScriptService").PraxsuiteSDK.PraxsuiteSDK) -- Path may vary depending on your folder structure
local Players = game:GetService("Players")
What does each line do?
Line 1 — Import the SDK:
local Praxsuite = require(game:GetService("ServerScriptService").PraxsuiteSDK.PraxsuiteSDK)require(...)— Tells Lua to load an external module and make it available in your scriptgame:GetService("ServerScriptService")— Accesses Roblox's ServerScriptService.PraxsuiteSDK.PraxsuiteSDK— Navigates to the ModuleScript inside the folderlocal Praxsuite— Stores the module in a variable. All SDK function calls go through this
Line 2 — Players service:
local Players = game:GetService("Players")game:GetService("Players")— Roblox's service that gives you access to connected playersWe need it to get each player's
UserIdand store it in Praxsuite
What is a UserId? Every Roblox account has a unique identification number. It's the most reliable way to identify a player — much better than their username, which can change.
Step 4 — Initialize the SDK
Initializing means "starting up" the SDK and telling it which workspace to work with. This is done once at the top of your script:
Praxsuite.Init({
    workspaceId = "ffd80539-a1e2-4a9e-8b33-f716bf690281",
    apiKey = "sk_live_...",
    autoFetchSchema = false,
})
What does each parameter mean?
Parameter | Description |
|---|---|
| Your workspace UUID. Found in Settings → General in Praxsuite. Replace the example with yours. |
| Your secret API key, starts with |
|
|
Important:
Praxsuite.Init()is called once across the entire server. Calling it multiple times or from multiple scripts can cause errors. Initialize it in one central place only.
Step 5 — Register Your Table
When autoFetchSchema is false, you need to tell the SDK which tables you'll be using. This avoids an extra network call at startup and makes your game load faster:
Praxsuite.Schema.Register("Roblox Leaderboard", "2785e1d3-4a78-4d1a-a30c-7071c268e718")The two parameters:
First parameter — Friendly name:
"Roblox Leaderboard"The name you'll use in your code to refer to this table. It doesn't have to match the table's name in Praxsuite exactly, but keeping them similar helps.Second parameter — Table UUID:
"2785e1d3-..."The unique identifier of the table in Praxsuite. Found in Table Settings → API inside your workspace. Each table has its own.
Tip: If you're using multiple tables in your game, register all of them at the top, one line each, before starting any data operations.
Step 6 — Insert Data
Now the interesting part: saving data to Praxsuite from your game. Here's how to insert multiple rows at once:
-- Get the player's ID
local myId = tostring(Players.LocalPlayer and Players.LocalPlayer.UserId or "server_test")

-- Create an empty list to hold the rows
local rows = {}

-- Use a loop to create 5 example rows
for i = 1, 5 do
    table.insert(rows, {
        ["Record"] = "Game Session " .. os.date("%Y-%m-%d %H:%M:%S") .. " #" .. i,
        ["Player Id"] = myId,
        ["Points"] = math.random(10, 500),
    })
end

-- Send all rows to Praxsuite in one request
local inserted = Praxsuite.Data.InsertMany("Roblox Leaderboard", rows)
print("[Praxsuite] Inserted " .. #inserted .. " rows!")
Line-by-line breakdown:
Get the player ID:
local myId = tostring(Players.LocalPlayer and Players.LocalPlayer.UserId or "server_test")Players.LocalPlayer— Attempts to get the local playerUserId— The player's unique numeric ID in Robloxtostring(...)— Converts it to a string since we're storing it in a text columnor "server_test"— Fallback value if there's no player (e.g. when testing in the editor)
Create the row list:
local rows = {}An empty Lua table where we'll append each row we want to insert.
The insert loop:
for i = 1, 5 do
    table.insert(rows, {
        ["Record"] = "Game Session " .. os.date("%Y-%m-%d %H:%M:%S") .. " #" .. i,
        ["Player Id"] = myId,
        ["Points"] = math.random(10, 500),
    })
end
for i = 1, 5 do— Repeats the block 5 timestable.insert(rows, {...})— Appends a new row to the list["Record"],["Player Id"],["Points"]— These must exactly match your column names in Praxsuite: same capitalization, same spacingos.date("%Y-%m-%d %H:%M:%S")— Current server date and time, formattedmath.random(10, 500)— Random number between 10 and 500 to simulate points
Send the rows:
local inserted = Praxsuite.Data.InsertMany("Roblox Leaderboard", rows)InsertMany— Sends all rows in a single request to PraxsuiteReturns the list of rows that were successfully inserted
Why
InsertManyand notInsertone by one? Every time your game communicates with Praxsuite, it makes a network request. If you have 100 rows and send 100 individual requests, it's 100× slower than sending 1 request with all 100 rows. Always preferInsertManywhen you have more than one row.
Step 7 — Query Data
Querying means asking Praxsuite to return data you've already saved. Here's how:
local leaderboard = Praxsuite.Data.Query("Roblox Leaderboard", {
    select = { "Record", "Player Id", "Points" },
    orderBy = { "Points", "desc" },
    limit = 25,
})
Query options:
Option | What it does | Example |
|---|---|---|
| Which columns to return. Omit to return all. |
|
| Sort results by a column. |
|
| Maximum number of rows to return. |
|
| Filters to return only matching rows. |
|
| How many rows to skip from the start — used for pagination. |
|
What is pagination? If you have 1,000 rows and only want to display 25 at a time, use
limit = 25andoffset = 0for page 1,offset = 25for page 2,offset = 50for page 3, and so on.
Step 8 — Display the Results
Once you have the queried data, loop through it and use it however you need:
print("\n=== LEADERBOARD (Top 25) ===")
for rank, row in ipairs(leaderboard) do
    print(
        rank .. ". " ..
        tostring(row["Player Id"]) ..
        " - " .. tostring(row["Points"]) .. " pts" ..
        " (" .. tostring(row["Record"]) .. ")"
    )
end
How this works:
ipairs(leaderboard)— Iterates over the result list in order, giving the index (rank) and value (row) each iterationrow["Player Id"]— Accesses the value of the"Player Id"column in that rowtostring(...)— Converts the value to a string before printing — good practice to avoid type errors
In the Roblox Studio console you'll see something like:
=== LEADERBOARD (Top 25) ===
1. 123456789 - 498 pts (Game Session 2025-01-15 10:30:00 #3)
2. 987654321 - 445 pts (Game Session 2025-01-15 10:30:00 #1)
...
Complete Script
Here's the full code in one place, ready to paste into your ServerScript:
-- ============================================
-- PRAXSUITE - COMPLETE EXAMPLE SCRIPT
-- File: PraxsuiteMain (ServerScript)
-- Location: ServerScriptService
-- ============================================

-- 1. IMPORT DEPENDENCIES
local Praxsuite = require(game:GetService("ServerScriptService").PraxsuiteSDK.PraxsuiteSDK)
local Players = game:GetService("Players")

-- 2. INITIALIZE THE SDK (only once)
-- Replace the values below with your own
Praxsuite.Init({
    workspaceId = "ffd80539-a1e2-4a9e-8b33-f716bf690281",  -- Your workspace ID
    apiKey = "sk_live_...",                                   -- Your API Key
    autoFetchSchema = false,                                  -- We register tables manually
})

-- 3. REGISTER THE TABLE WE'RE GOING TO USE
-- First parameter: name used in code
-- Second parameter: table UUID in Praxsuite
Praxsuite.Schema.Register("Roblox Leaderboard", "2785e1d3-4a78-4d1a-a30c-7071c268e718")

-- 4. INSERT DATA
-- Get the player ID (or a test value if no player is present)
local myId = tostring(Players.LocalPlayer and Players.LocalPlayer.UserId or "server_test")

-- Create 5 example data rows
local rows = {}
for i = 1, 5 do
    table.insert(rows, {
        ["Record"] = "Game Session " .. os.date("%Y-%m-%d %H:%M:%S") .. " #" .. i,
        ["Player Id"] = myId,
        ["Points"] = math.random(10, 500),
    })
end

-- Send all rows in a single request
local inserted = Praxsuite.Data.InsertMany("Roblox Leaderboard", rows)
print("[Praxsuite] Inserted " .. #inserted .. " rows!")

-- 5. QUERY THE LEADERBOARD
-- Get the top 25 scores, sorted highest to lowest
local leaderboard = Praxsuite.Data.Query("Roblox Leaderboard", {
    select = { "Record", "Player Id", "Points" },
    orderBy = { "Points", "desc" },
    limit = 25,
})

-- 6. DISPLAY RESULTS IN THE CONSOLE
print("\n=== LEADERBOARD (Top 25) ===")
for rank, row in ipairs(leaderboard) do
    print(
        rank .. ". " ..
        tostring(row["Player Id"]) ..
        " - " .. tostring(row["Points"]) .. " pts"
    )
end
Additional Operations
Filtering with Where
The where filter lets you retrieve only rows that meet specific conditions:
Simple equality filter:
-- Returns only rows where Player Id is exactly "12345"
local my_rows = Praxsuite.Data.Query("Roblox Leaderboard", {
    where = { ["Player Id"] = "12345" }
})
Filter by greater than:
-- Returns only players with more than 100 points
local top_players = Praxsuite.Data.Query("Roblox Leaderboard", {
    where = { Points = { gt = 100 } }
})
Filter by text containing a substring:
-- Returns rows where Record contains the word "Session"
local search = Praxsuite.Data.Query("Roblox Leaderboard", {
    where = { Record = { like = "%Session%" } }
})
What does
%mean? In thelikeoperator,%is a wildcard meaning "anything". So"%Session%"means "any text that contains the word Session anywhere."
Available operators:
Operator | Meaning | Example in code |
|---|---|---|
| Equal to (default if no operator is specified) |
|
| Not equal to |
|
| Greater than |
|
| Greater than or equal to |
|
| Less than |
|
| Less than or equal to |
|
| Contains text (use |
|
| Is within a list of values |
|
| Field is empty / has no value |
|
Updating Data
To modify rows that already exist in Praxsuite:
Praxsuite.Data.Update("Roblox Leaderboard", {
    set = { Points = 999 },
    where = { ["Player Id"] = "12345" }
})set— Defines which columns to change and what value to setwhere— Defines which rows will be modified
Warning: Running an
Updatewithout awhereclause will modify every row in the table. Always includewhereto target only the rows you intend to change.
Deleting Data
To remove rows from Praxsuite:
Praxsuite.Data.Delete("Roblox Leaderboard", {
    where = { ["Player Id"] = "12345" }
})
Warning: Just like
Update, omittingwherewill delete all rows. This operation cannot be undone — use with care.
Counting Rows
If you need to know how many rows exist without fetching all of them:
-- Count all rows in the table
local total = Praxsuite.Data.Count("Roblox Leaderboard")

-- Count only rows where Points is greater than 0
local active = Praxsuite.Data.Count("Roblox Leaderboard", { Points = { gt = 0 } })

print("Total records: " .. total)
print("Players with points: " .. active)
This is far more efficient than running a Query and manually counting the results.
Inserting a Single Row
When you need to add just one record — for example, when a player defeats a boss:
Praxsuite.Data.Insert("Roblox Leaderboard", {
    ["Record"] = "Boss Kill",
    ["Player Id"] = tostring(player.UserId),
    ["Points"] = 50,
})
Use Insert for one row and InsertMany for multiple — this way the SDK optimizes the request correctly.
Common Errors and How to Avoid Them
Error | Cause | Solution |
|---|---|---|
| API Key is misspelled or incorrect | Verify it starts with |
Data doesn't appear in Praxsuite | Column names in code don't match the table | Check exact capitalization and spacing in column names |
Script doesn't run | Placed in a LocalScript instead of a Script | Move it to |
| The | Copy it directly from Settings → General in Praxsuite |
| Accessing a column with the wrong name | Verify the exact column name using |
Production Tips
Once your game is ready to publish, keep these in mind:
Use
autoFetchSchema = falseand register tables manually — faster startup, more predictable behaviorAlways use the SDK from ServerScripts — never LocalScripts, no exceptions
Use
InsertManywhen you have multiple rows — reduces the number of network requestsAlways set a
limiton your queries — controls how much data you receive and prevents slow responsesColumn names must exactly match your Praxsuite table — respect capitalization and spaces
To protect your API Key in production, use
apiKeySecretinstead ofapiKeyto store the key in Roblox Secrets Store, Roblox's secure storage system for sensitive data
Next Steps
Now that you know the basics, some ideas to expand your integration:
Build an in-game visual leaderboard that reads live data from Praxsuite
Save player inventory or progression between sessions
Log in-game events (kills, achievements, playtime) for analytics
Create multiple tables in Praxsuite for different data types and register them all in your SDK
If you have questions, check the official Praxsuite documentation or ask in the community. Good luck with your game.